You should never pay extra if your move takes longer than planned. With no hourly rates and service that goes above and beyond, Ferguson lifts your expectations for what a moving company can do.
Your Personal VIP Move Manager
Ferguson Moving and Storage’s concierge-style approach to service makes it easy for customers to get the answers and support they need.
On Time Arrival
We value your time and also consider time as money. Hence by arriving on time, we ensure that we save your time and money.
When you’re moving, you’re probably also purging. There may be junk you need to get rid of. You could pay a junk removal company to come and take it all away – and that may be your best bet for various types of junk and a big load.
But did you know that many Metro Vancouver cities offer free pick up or junk clear out? They are limited though, so don’t think you’ve hit the jackpot! There is a reason junk removal companies in Vancouver are so abundant.
In this article, we’ll let you know a few ways you can have your junk removed by city services, which you may already pay taxes for.
Corporation of Delta yearly spring clean up
If you are moving within or out of Delta, and if moving day is in the spring, you could plan to get rid of a lot of your junk for free. While there are limits to what the corporation will take, you can use this opportunity to throw out broken furniture, useless toys, old couches, BBQs and stuff that can be bundled up, as long as it doesn’t violate the ‘not accepted’ terms. Mattresses are not accepted – keep that in mind!
If you are a Burnaby resident, you can ask the city to come to your curb to pick up the ‘big things’ that you need to throw away. Mattresses are eligible, unlike Delta’s spring clean up rules. But, they do require you call them beforehand to make sure they will take your item. If you live in an apartment, you may have to make arrangements to move your large item to a special area, which can involve some heavy lifting.
New Westminster fee-based disposal pick up service
Ok, this one is not free. And there may be some restrictions on what the city could pick up for you. But if you live in New Westminster, this may be worth looking into, especially if you only have one big thing you need to get rid of. Then, compare that fee with the price of having a local junk removal company come to get it.
Like in Burnaby, residents of Richmond can take advantage of the city’s large item pick up service. However, this is clearly limited to only “four large household items per year.” And there are restrictions. But for the most part, your furniture junk should be ok. They do make a note that mattresses have to be kept dry and wrapped in plastic, so keep that in mind. They also have an online form to fill out if you don’t want to call in, so that may be a convenience to try.
Similar to Richmond’s program, the City of Surrey offers residents – seemingly only from Newton – to dispose of up to 4 large items per year. And mattresses are accepted. You do have to call in to schedule a pick up. Also, only some apart buildings are eligible for this service: https://www.surrey.ca/city-services/21317.aspx
Again, this one is limited to 4 large items per year, and the restrictions are similar to the above programs. They don’t mention anything about apartment dwellers, but their phone number is on their site to find out more.
While the City of Vancouver doesn’t advertise large item pick up, they do allow you to upgrade your bin size to accept more garbage on the regular schedule. This could be a way to accommodate your junk needs all year round, if they accumulate for you. That said, be aware of the restrictions!
Some things to keep in mind about municipal junk removal before moving
City junk removal services are not ‘full service’! You will have to sort your waste, and bring it to your curbside. If you can’t do that, it’s best you hire a junk removal company to help you out.
These services are also not likely going to work on your timeline. If you are trying to have junk removed last minute – especially if it’s actually on moving day – you may be in a rut. So this is something you need to plan for.
There may be items that are banned from city waste pick up services. You’ll need to handle these yourself by taking them to the appropriate dumping or recycling facilities.
Most of the time, as you’ll see in your investigations, ‘commercial’ waste is not accepted. So if you’re hoping to use these services for getting rid of your car parts or renovation junk, chances are it won’t work. They’re meant to be residential.
There are fines for illegal dumping, so don’t try it!
If you didn’t see your municipality listed above, you can google its name with “large item pick up” to see what comes up. And also, keep in mind bylaws can change all the time. So by the time you read this – especially if it is years from the date of publishing – the rules may have changed. Be sure to call your city services to find out more!
When you’re moving your entire house, you have a lot of ‘big’ things to worry about. Packing, padding, selling, purging…it’s a lot of work! But logistically, when it comes time to move the big things (and not just the boxes), you’ll find that they can be a lot of work. Having the right tools can make all the difference. And that includes dollies.
But, different dollies do different things (for better or worse!). In this article, we’ll explain what the different types of dollies are, so you can get an idea of which ones you’ll need, depending on what you’re moving.
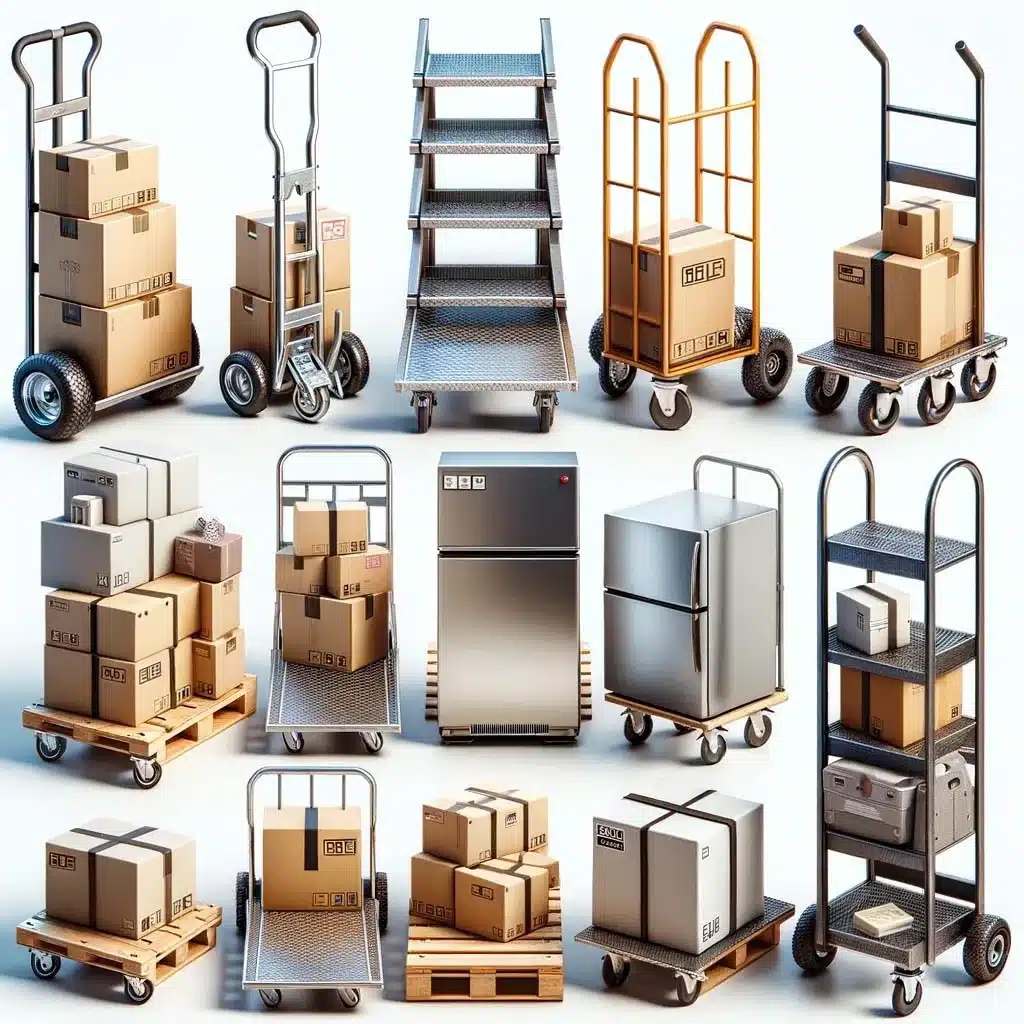
Upright, hand-truck 2-wheel dollies
These can be as simple as a metal rack with a small base and wheels. It’s up to you to tie things to it that may fall over during transport.
When you get into fancier models, they can also lay down flat and turn into a wagon-style dolly. So that would give them 4 wheels, but they don’t always have to stand on all fours.
And then, the features can include different types of wheels for different strengths you’ll need, plus foldability and so on.
Platform, 4-wheel dollies with handle bars or without
These dollies have 4 wheels and are meant to be used for bigger objects that need more of a base underneath them.
Sometimes, there is a handlebar, and that handlebar can fold down for easy storage. The casters are usually the swivel kind.
These dollies are wider, and that can also mean they are hard to go up and down stairs, or may not fit through typical house-sized doors.
That said, they can come in all types of sizes and materials. Some are good for industrial applications, and some are smaller and clearly made for moving household or office furniture and boxes, or the like.
Frame-style flat dollies on casters, 4-wheel, with or without handle bars
These moving dollies are similar to the above platform-style dollies. However, their base is not ‘filled in’ and consists of a frame bottom with a ‘hole’ in it.
The frame can be made out of steel or wood. Sometimes they are carpeted too. They always have at least 4 wheels, since they lay flat. And the wheels can be made of different materials, which can help to be aware of if you need to move across special types of floor or ground.
This the type of dolly that you may find when shopping at Home Depot or a hardware store (like the platform dollies mentioned above). They are often designed to move long, horizontal objects like rolls of carpet or lumber. In the case of household moving, they can be used for things like mattresses, bed frames and shelving.
These can have a platform-style base, or a ‘frame’ base. But they are built with protection on at least two sides. They push like a cart. And, like the other moving dollies mentioned above, they can be made of various materials. They also can have different names, like “panel cart” or “carpet dolly” and so on.
Some are narrow and tall, some are wide and flat, and some can be made for special uses.
Automotive dollies, also called caster wheel dollies
Depending what you need to move, sometimes automotive dollies come in handy. These are kind of like the platform dollies mentioned above, without handlebars, but they are indented or curved instead of being flat.
Specialty dollies for moving pianos, hot tubs, appliances and more
Aside from the multi-use dollies mentioned above, sometimes special cases require special dollies. For example, there are companies that make dollies specifically for moving pianos or hot tubs.
These will have a specific shape and purpose (of course). They are usually what professional movers will have on hand for carrying out big and careful moving jobs frequently. The investment to buy these things for your one-time move may not be worth it.
Make sure your professional movers have the right dollies for your move
When you hire a professional mover, you’ll know how experienced they are based on the tools they have ready for your job. They’ll also be able to make recommendations on how to move your furniture or appliances, etc. with ease. That may include some specialty dollies.
When you look online for Vancouver hot tub movers, or instructions on how to move a hot tub, you’ll get some confusing information. But if you look a little more, you’ll find out that moving a hot tub is no easy feat. This is why you may want to hire professional movers for this job. But if you want to do it yourself, or make sure your hot tub movers know what they’re doing, we’ll give you some tips in this article.
Moving a hot tub is expensive
The first thing you’ll want to really consider is whether or not it’s worth the payoff to move a hot tub in Vancouver. Sometimes, the cost of moving this large, over-sized luxury is about as much as it would cost to buy a new one. But, that doesn’t consider factors such as installation and delivery fees. And of course, if you invested in a pricey luxury spa for your backyard, moving it might be worth it, if you want to keep that investment.
Keep in mind however that once you move your hot tub, it will need to be re-installed. So you’ll have delivery fees (which can cost hundreds), and then installation fees. Possibly even repair fees if things go awry during the move.
If you read this guy’s story of finding a used hot tub, then transporting it himself (with friends), you’ll see that while yes, he saved money on the big picture. But he also had to do A LOT of work, pay a lot to move it, and already had the know-how in “physics, engineering, plumbing, hydrodynamics, electrical engineering” to make it all worthwhile. A novice – or merely a busy person – would probably not be able to do all this. So there is a reason why professionals need to charge as much as they do for moving something as complex as a hot tub.
Moving a hot tub is risky
A hot tub can break during transport, and it can also cause injuries. These spa pools can weigh between 500-1000 pounds. You will likely need to get the structure on its side, and that will require heavy lifting. Do you want to put your friends through that risk? A professional mover will have the right workers compensation insurance for any potential injuries, not to mention trained staff.
You need proper equipment to move a hot tub
You could try to wing it and move a hot tub with a few small doilies and some reliable, strong friends. But chances are, you’ll find that it’s a heavy, heavy item. It probably won’t fit in a moving truck (depending on size, of course). So you’ll need to get it on a trailer.
There are companies that make equipment specifically for hot tub movers. Here are some to check out, so you get an idea of what you’ll need for this job:
If you don’t have the made-for-hot-tub tools, you’ll need at least 4-wheeled dollies, preferably those with a flat bed of some sort (like skid movers), 4×4 wood or pallets, straps and the right protective gear.
Remember the small details when moving a hot tub
When you move a hot tub, you’ll also need to consider the small details. For example:
How are you going to wheel it to a truck once it’s on dollies? Some videos online will show movers using planks of plywood to create a flat, smooth surface all the way to the vehicle. You’ll need to purchase these as well.
Is it completely drained and dry for the move? You won’t want to move a hot tub that is wet, as that will make the job all the more annoying. In fact, this article mentions that if you’re moving in cold temperatures, water can freeze and damage your pipes in the tub! On that note, you may want to get it well cleaned before you move, or right after it lands in its new spot.
Do you have the padding material to keep it safe? Don’t let it crack or dent! Get the right protection for your hot tub when moving it. And that is not the top cover! Tape cardboard, blankets, whatever it takes to keep it from hard bumps.
What about re-installation? We mentioned this above, but don’t forget you can’t just plop it down on the grass in your hard and fill it with water! It needs proper installation.
Will your warranty cover a self-move? Maybe you want to hire insured movers for this, so that you’re covered if the hot tub breaks during transport.
How will you store all the small parts? We recommend you keep the blowers, pumps, heaters, cords, plugs and caps, wires or anything small and detachable that goes with the tub in a contained, separate bag or box. Don’t let these lie around where you’ll forget about them!
What if you have to get the hot tub through small spaces? Think about the logistics before you try to relocate your hot tub!
Consider recycling an old hot tub
If your hot tub is old or damaged, and you basically want to get rid of it before you have to move, you can consider two options:
Call a junk removal company to come and deal with it for you
And yes, there are fees associated with the above options.
Need a hot tub mover in Vancouver?
As you can tell by the above advice, moving a hot tub is not easy, and we don’t recommend doing it yourself. We have plenty of advice on how to move other items on your own, on our blog. But this one is a bit of a mountain to climb. Give us a call, and we can discuss how to move your hot tub if you need us to, or if it’s a good idea.
If you’ve invested in good quality material for your kitchen, you’ll probably also be dealing with a countertop that is worth hundreds, if not thousands. If you want to DIY the transport of your countertop, you’ll need to take precautions to avoid your investment going to waste, which can happen easily with these large, heavy items.
Usually, for new countertops, the company that is custom-fitting them will also deliver and install them. But if you want to do the delivery yourself to save money, or are planning to upcycle a used countertop, this added service may not be available.
In this article, we’ll give some tips on how to move a granite, concrete or wood countertop.
Ensure you have the proper equipment, and helping hands, when moving a stone countertop
Most of what will determine your success at moving a heavy stone countertop is going to be your equipment and tools. This is because granite, marble and concrete are prone to breakage and cracks during transport. This is moreso the case if you have sink holes pre-cut into them.
Here is what you are going to need:
An A-frame: this is some wood that is fashioned and bound together in the shape of an ‘A.’ They can be made of metal or wood. They allow for slabs or large panel-type items (even heavy art frames, or glass), to be transported while leaning on its edge. This is necessary because:
Granite and stone countertops can crack if transported flat, or horizontally.
Countertops are usually far too heavy for human strength to carry them a long way.
Here is a google image search for “a frame for transport”, to give you some visuals of what you’re looking for.
Moving straps: Somehow, you’re going to need to tie the countertop slabs to the A-frame so it doesn’t wobble or shift during the move. This page has a diagram showing this. We recommend professional straps, of course. This article says to use “ratchet tie-down straps,” which can be searched on Google images here. Remember: your countertop can be worth thousands, so don’t risk it with cheap rope or material.
Moving blankets or padding: To help alleviate impact, you want to use padding on the granite, making the hits a softer blow to the fragile rock-in-transit. Especially if you are transporting more than one countertop at a time, these are a must. Bubble wrap may work. Ensure you have a way to prevent the padding from falling off while moving the countertop.
Carrying clamps: these nifty items attach a strong grip to the sides of the countertop, giving you a handle from which to carry them from. Here is a google image search for them, to show you some options.
Gloves with grip: don’t trust your hands alone to carry the countertop, especially when carrying it off the A-frame, and onto the cabinets, or through the building around doors. You want a strong, strong grip during this process.
Extra humans: granite and concrete are very, very heavy. Unless you are Thor, please don’t expect this to be a one-person job. Avoid injuries, and take safety precautions (like steel-toed boots) when carrying something this heavy too.
Use the right techniques for moving heavy countertops
When you move a heavy countertop, you want to keep these points in mind:
Always carry the countertop vertically, not flat, as noted above.
Never drag or push the countertop. It can only be carried. Don’t attempt to do it on your own.
If you use a dolly or push cart, watch out for when you roll over rocks or uneven ground. Remember, you want to avoid anything that can crack something fragile through impact. Consider the countertop as fragile as glass.
As an article linked-to above suggests, try to set up ‘rest stops’ on your way to the home when moving a stone countertop from the truck to the building it’s going in (or visa versa). Since they are so heavy, you’ll want to be able to put it down without causing cracks or chips. Going all the way down to the floor multiple times can strain your back. Using workbenches, sawhorses, or other sturdy support structures can be useful for this.
Read up on moving techniques before doing this! Here are some articles on our blog to help you out:
Truly, honestly, consider hiring a professional for moving expensive countertops
Moving a heavy, expensive countertop is hard, and there is a lot of potential for breakage. This goes even if you want to move one from salvage – why waste your day, and end up with junk at the end of it?
A professional moving company, or granite countertop maker, could also have the right insurance to cover you for losses.
Take a look at the cost-payoff benefit, and decide if it’s worth the risk before you move a countertop.
When you have large appliances you’ve invested in, you may be taking them with you on your next move. This is more likely with deep freezers as they can be an addition to a home that a family purchased out of need. However, moving large appliances can come with nuances you need to be aware of. They are not as simple as moving boxy furniture. This is because there are inner working parts inside the ‘box’ of the appliance that need to be handled carefully.
As a follow up to our article on how to move a refrigerator, in this article, we will discuss how to move a deep freezer.
Step one: have a safe plan for the food you will be removing from the deep freezer
This is obvious, but keep in mind that when you remove food from a deep freezer, you’ll need an action plan of what you’re going to do with it. In our article on how to pack kitchen food, we gave some tips, and discussed eating as much of your food as possible before moving day.
You can’t move a freezer with food in it. And, freezer food doesn’t have shelf life, of course. So this is going to be a bit tricky. If you are doing a short distance move, you can likely get away with buying coolers, filling them with ice or ice packs, and driving them to your new home yourself. If you can get dry ice, that may last longer. But be careful when handling dry ice!
Movers won’t move food, so don’t expect them to take care of this process.
You also probably don’t want to defrost food in a freezer and then refreeze it, as that can result in freezer burn. Not only that, there are food safety considerations at play when you defrost meats or contaminated foods. You don’t want to end up with food poisoning as a result of leaving your foods out of frozen temperatures too long. Listeria can be found in frozen foods, so this is a real concern.
Some foods are expensive, and if you have a deep freezer full of hunted game meat, or any meat for that matter, you may not want to throw it away as a result of having to move. So this is something you’ll want to plan for in advance.
Step two: unplug, defrost and clean the deep freezer before moving day
Before you move a deep freezer, you’ll want to make sure it is thawed out. Unplug it to get ready for this process. Of course, it will have to remain unplugged when the movers arrive, or when you want to load it up on a moving truck.
How long does it take to defrost a freezer? The internet will give you different advice on this; 6 hours, 8 hours, 12 hours, 24 hours…. We recommend checking the manufacturer’s website, and if you can, read up on the model you bought. Many modern freezers are frost free, but still need to thaw. If you have a freezer with frost around its sides, you might need to do some chipping away at it to help the defrost process…and to prevent a water spill after a few hours!
It’s a good idea to clean out the deep freezer too. You won’t want melted ice causing surprise water spills during the move. You also don’t want to bring bacteria along the way, which will love the warmer climate once the freezer is defrosted and unplugged. So wipe it down thoroughly. You can give it another clean when you get to your new home. This is a good opportunity to take care of this ‘spring cleaning’ chore.
Step three: tie it up and pad it
When moving a deep freezer, you want to keep it safe from damage. Find a way to tie the door down so it doesn’t swing open during the move (especially if it’s on its side – see below). Also, cover with blankets or some badding to prevent scratches, or worse, dents and holes. You’ll want to pack it in a moving truck in a way that it won’t move around too much, avoiding bangs and knocks on the way to your new home.
Step four: when moving a freezer, keep it upright if you can
Keeping a freezer or fridge upright while moving it is usually always recommended. This is because there are liquids pertinent to the operation of the deep freezer that need to stay in place to keep it working.
GE’s website says if you can’t keep it upright, “lay it down on the compressor side of the unit.”
If you move the freezer on its side, make sure it stands upright for a period of time before you plug it in again. How long? Again, best to consult your manual, or call the manufacturer, as different advice exists on this online. One common rule of thumb is to leave it upright for the same amount of time it has been on its side. This is what the GE website says (link above). Others will say 24 hours.
To conclude: call professionals if you need help!
Damaging your deep freezer during a move can be an unnecessary financial loss: even if your deep freezer wasn’t that expensive. Still, why waste money? Professional movers are careful and know what they’re doing when moving a freezer. They also offer insurance to protect your items from damage on moving day.
If you need help moving a deep freezer, give us a call! We offer no-obligation, free in-home estimates for families moving house.
Recent Comments